Workbooks have a couple of new action types which let you do some very cool things. The one I’m going to focus on now is called ARM actions and this is some amazing stuff , if you thought workbooks were powerful before then watch this space!
Arm Actions
First ARM actions can be used to call various Azure actions against a resource. In the example workbook you can Start and Stop a website which is quite useful as you can do it directly from the workbook without having to navigate to the Resource Blade.
This uses a parameter to fetch the site name and pipes it into an ARM action of Start
Calling a Logic App
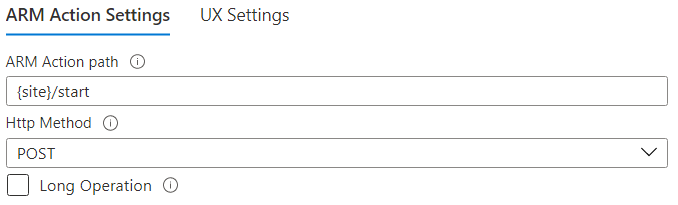
Super cool and very useful. Now lets look at how we can up our game a little bit. Using this same method you can actually call a Logic App, this is slightly more complex as you need to have the ARM Action path to said Logic App which looks like this:
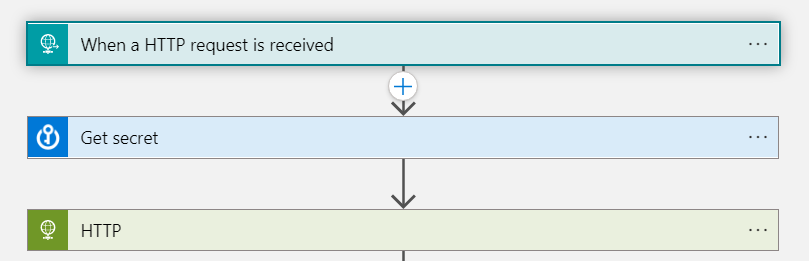
Note the various parameters and you can also parametrize the Logic App name, I have it hardcoded in this example. Also note in this case the trigger type is manual, this because the Logic App trigger is “When an HTTP request is received” and I am sending a JSON payload from the worbook to the Logic App.
You can also specify other triggers for Request, Recurrence and API Connection.
Now what can you do with this? Well as you might imagine the possibilities are endless, in my case I’m calling the Logic App to populate a secondary set of App data into Log Analytics to add more scope to the original workbook.
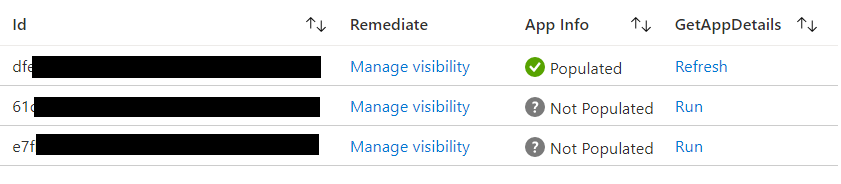
Once the Logic App has been run the App Info column changes to Populated and the GetAppDetails prompt changes to Refresh, the data is then made visible in a second grid below.
Conclusion
I’m very excited by the world that has opened up with this type of advanced workbook essentially turning them from an awesome visual tool into an awesome manageability tool.
If you ‘ve made use of this functionality I’d love to hear from you.
I was recently afforded a very interesting opportunity to help extend the reporting capability of Microsoft Defender, the end result used a combination of a logic app and a workbook to achieve something that is quite awesome (even if I do say so myself). Huge thanks to Jason Baxter and Hesham SaaD for their part in this.
It is worth noting that while this particular case used Sentinel you can achieve the same with Azure Monitor and a standard logic app, the choice will come down to whether or not the data is security related.
Now while the full details of the solution can be found here. I wanted to take a brief moment to talk about the power of the framework for this solution which can be broken down into key components.
An API – now lots of applications have easily accessible monitoring data, however some don’t and there is often a wealth of information to be found with a web call to an API endpoint.
A logic app – getting data from an API to log analytics may seen complex but using a logic app offers a low code approach which can meet most solutions needs. In the event of scaling it is also possible to use PowerShell and Azure functions to achieve a move robust result.
A Workbook – As some of you may know I am a huge proponent of workbooks, they offer interactivity and flexibility while being easy and quick to create (more on that here), and you can of course also alert on the data once it’s in your Log Analytics workspace or even use PowerBI to further enrich your visuals.
The possibilities are literally endless, in the last week alone I’ve been asked to adapt this method monitor elements of other products such as Microsoft Teams. This a great method to keep in the back pocket and I’d love to hear from anyone who’s using it or something similar.
I came across a great browser extension a while ago called Azure Mask. I’ve been following the development of it closely because for a while it didn’t work with Edge. That issue is now fixed so lets have a look.
Azure mask does exactly what it says on the tin, it will mask your Azure subscription IDs and make them appear blurred out, this is a great tool for anyone presenting or screen sharing in Azure.
Looking at the below you can see exactly that
There’s even a hand toggle to easily turn the mask on and off
Azure Mask is available for Chrome (so it works on Edge) and Firefox and is available here from GitHub big kudos to developer Brian Clark
With Event Log collection in Azure Monitor Logs (Log Analytics), if the log name is too long you can’t see the full name in the UI and it can be tricky to check what the log is.
Especially if you don’t have data yet.
Here’s a quick script using Get-AzOperationalInsightsDataSource that will display the event logs you are collecting.
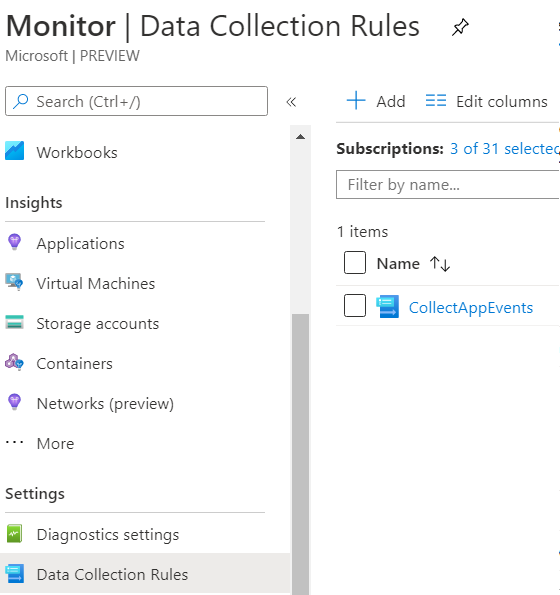
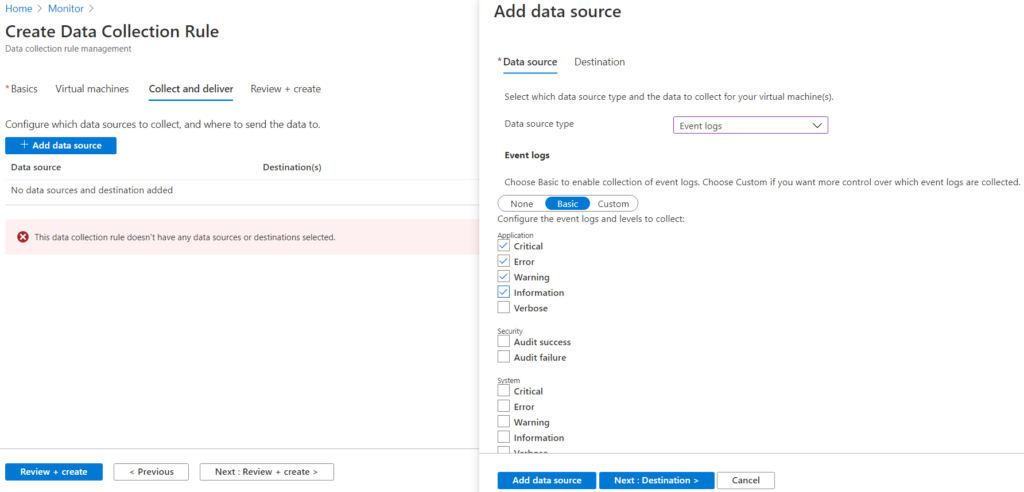
The new Azure Monitor Agent, is available for preview in the Azure Portal, lets have a look at how to configure data collection for this new experience.
If the Azure Monitor blade there are a couple of changes, we’re interested in the new option called Data Collection Rules this is how we’ll tell out new agent what data to collect.
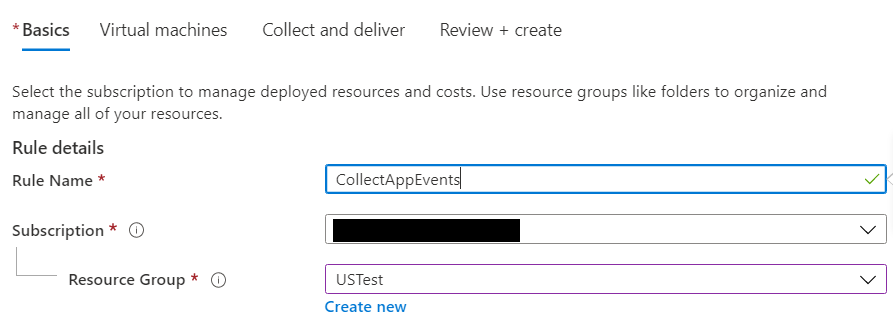
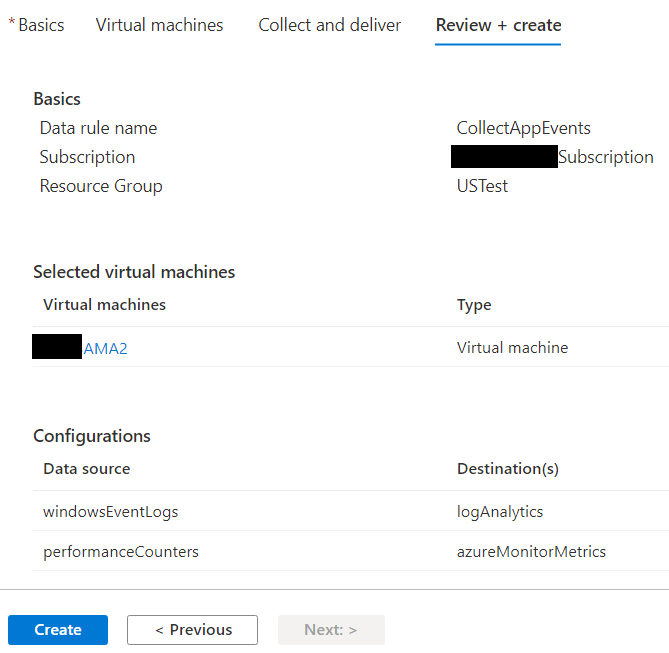
Clicking new we can see there’s a few tabs to configure, under Basics, we need to name our rule, choose a subscription and resource group.
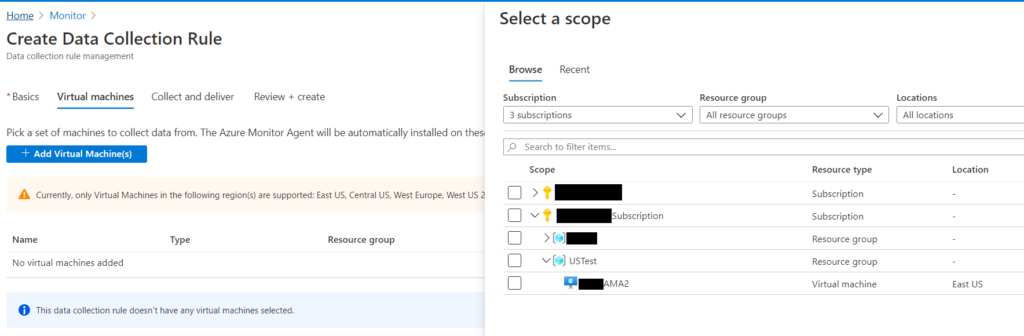
Next we need to choose the Virtual Machines we can to add to the rule, this will also deploy the agent to the VM if necessary. Note that due to the agent being in preview that it is not available in all regions currently.
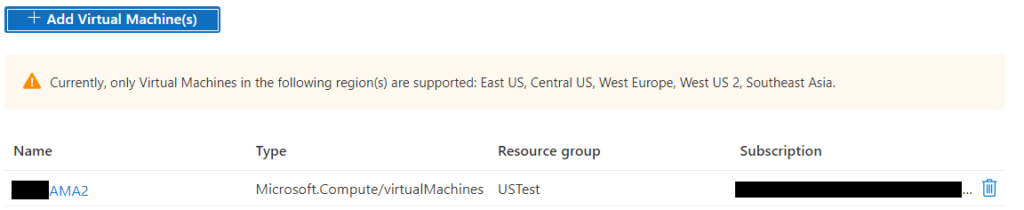
Below the selected machines are all set and ready to go.
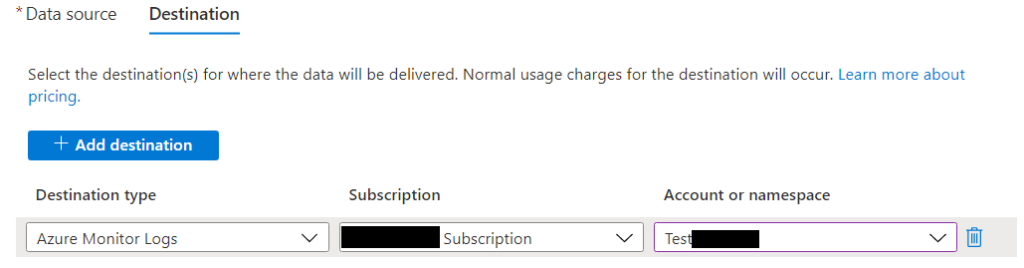
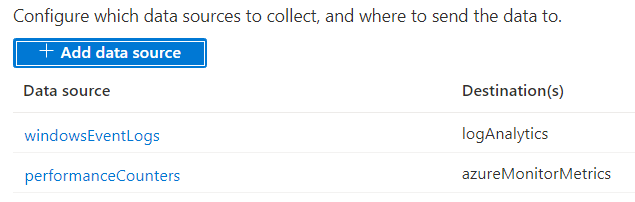
Finally we need to configure what this rule is collecting, you can choose logs or metrics and you can be more granular then before when it comes to log collection with a custom filter.
You can also have log and metrics collections in the same rule.
Once everything is configured simply click create, the agent will be deployed if necessary and the collection will start.
Let me start by saying that this news is really exciting, as any one in the monitoring world can tell you SCOM has faced a little bit of uncertainty in the past and the announcement of an upcoming SCOMaaS offering from Microsoft sends a clear message that the product has a place in the companies future.
Not a lot of information is available yet but here’s what we do know:
For starters the solution will be containerized which will leverage all of the benefits of containers such as speed of deployment and scaling to name a few.
A SCOM administrator will be able to “lift & shift” their existing SCOM environment into Azure – Aakash Basavaraj Program Manager for the SCOM Team at Microsoft.
This bodes well for existing SCOM customers as it means that the ability to easily migrate to a SCOMaaS solution will be available and that they won’t have to set up their new platform from scratch. This really shows that Microsoft has given thought and care towards truly bringing SCOM to the cloud.
When will is be available?
Unfortunately no details are available yet around timelines or pricing, I know I’ll be watching this develop with keen interest. One thing is for certain SCOM and Azure Monitor are now more firmly hand in hand then ever before.
I recently published an article on LinkedIn with my thoughts on monitoring Hybrid cloud with Azure Monitor and SCOM, I am cross posting on my blog for my record but if you prefer you can also read it here https://lnkd.in/d8PvWsH
With the shift of the IT landscape towards public cloud and then toward hybrid there has been some confusion as to which monitoring solutions are the best fit. People with System Center Operations Manager (SCOM) are wondering about the product life-cycle and others are wondering where Azure Monitor comes into the picture.
Hopefully I can shed a little light onto this puzzle.
First lets look at SCOM, well good news, it’s not going anywhere for quite some time. The current iteration 2019 has a commitment of 10 years of support from Microsoft with an Update Rollup release every 6 months. If you have any on-premise real estate then SCOM is still a strong contender to manage those systems with it’s powerful proven track record, extensible custom monitoring and data-center focused features. If you have extended your network into the cloud you can also leverage these features for your data center-like IaaS components such as VMs.
Now for your cloud needs, let’s talk Azure Monitor. You may be thinking “but I’m not using Azure” and that’s ok because have I got more good news for you, Azure Monitor can integrate with VM’s running on other clouds, additionally with Azure Arc you can now make use of Azure services and features on any cloud.
Azure Monitor is a cloud first monitoring tool as such it’s designed to manage and monitor a wide range of cloud components and services leveraging not only the real-time capabilities of Azure Metrics but also the power of Log Analytics both of which feed into a wide variety of insights, visuals and analysis tools. This allows you to have a complete in-depth picture of your cloud real estate from a single location. Azure Monitor is also designed to be configured to monitor only the items you deem most critical which, when done properly results in a lean noise free monitoring experience.
So what should I use to monitor my Hybrid Cloud scenario?
The short answer is: No matter where you are you are on your cloud journey there’s a monitoring scenario that has you covered.
Regardless of whether you are migrating your VMs to an IaaS platform; refactoring your on-premise applications to leverage PaaS/SaaS services or have some applications which reach back into your on-premise environment, you have options and you don’t have to use a single tool either
Lets unpack this a bit.
If you have a large on-premises environment then certainly a data center designed tool such as SCOM will meet your needs and it can also cater for any VMs that you have migrated into the cloud. This will of course give you the on-prem monitoring experience that you are familiar with, which does offer a level of comfort while preparing to move to more cloud focused services.
Similarly if you are nearing the end of your cloud journey then Azure Monitor has got you covered from Billing to Subscriptions and everything in-between. Not only will you be able to proactively handle your tenant and resources through automation but you will also have access to rich interactive reports in the form of workbooks as well as machine learning capabilities.
However if you are between these two scenarios you can use both tools, in fact I’d even encourage it, they work very well together and leverage each others strengths to give a comprehensive single pane of glass across any Hybrid environment.
Adding parameters to a workbook allows you to change values in your queries such as workspace without having to manually edit the query. This makes workbooks much easier to use and widens the potential audience.
Lets look at how to add parameters, some common ones and a little cheat sheet I use to quickly start a new workbook.
Adding Parameters
Parameters can be added into a KQL query by including the parameter name in braces, for example if I have a parameter for Time I can reference it in my KQL query as {Time}
There are currently four different supported parameters:
Text – An editable text box Drop Down – Choose from a defined set of values Time Range Picker – Choose from a predefined set of time range values Resource Picker – Choose from resources selected for the workbook
Example Parameters for our Quick Start Template
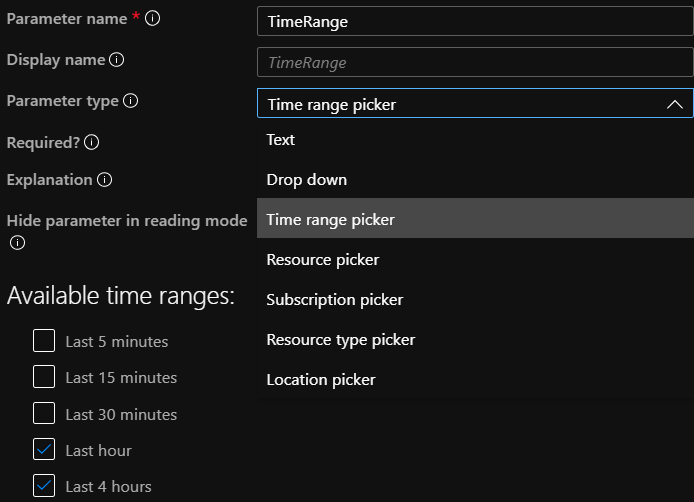
Time
Adding a time parameter is relatively straight forward as it is a pre-defined parameter type, click add parameter and give it a name, select Time range picker from the type field and select the times ranges you want to be available. Then click Save
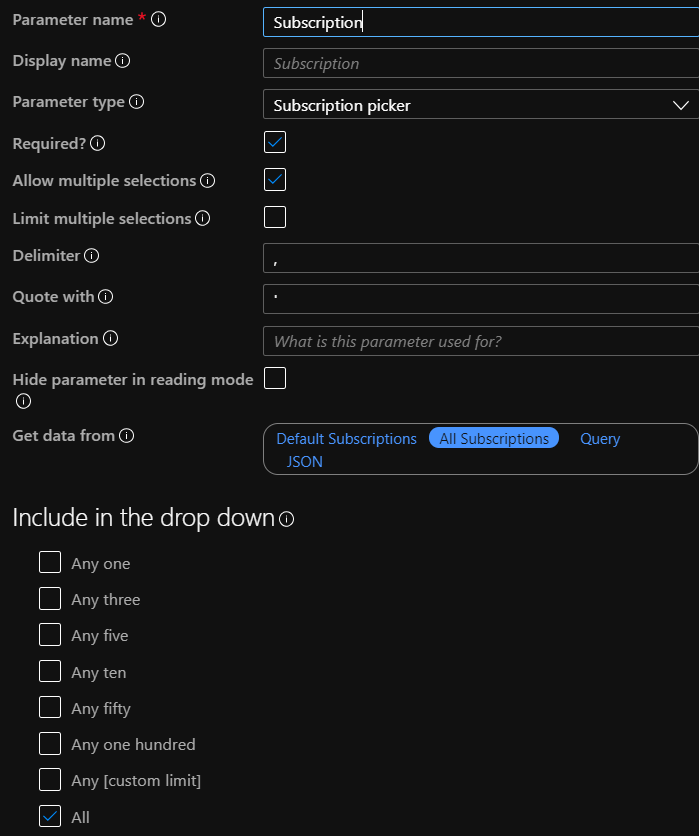
Subscription
Adding a subscription parameter is very useful as it allows your workbook to be able to query across subscriptions easily. After giving the parameter a name, choose Subscription picker from the type. Tick Allow multiple selection and also include the All option below then you can select from Default Subscriptions and All Subscriptions. Then click save.
Workspace
Workspace is useful for the same reasons Subscription is, this will allow a workbook to easily query across multiple workspaces from a single location.
This one is a little more complex to configure as it you’ll need to reference the workspaces through a KQL query, there are several ways to do this and i’ll share the one I am currently using.
As before name your parameter, this time choose Resource picker, allow multiple selection and All as options and then select Get data from Query, set your source to Azure Resource Graph and Subscription, the query I use is below:
where type =~ ‘microsoft.operationalinsights/workspaces’ | order by name asc | summarize Selected = makelist(id, 10), All = makelist(id, 1000) | mvexpand All limit 100 | project value = tostring(All), label = tostring(All), selected = iff(Selected contains All, true, false)
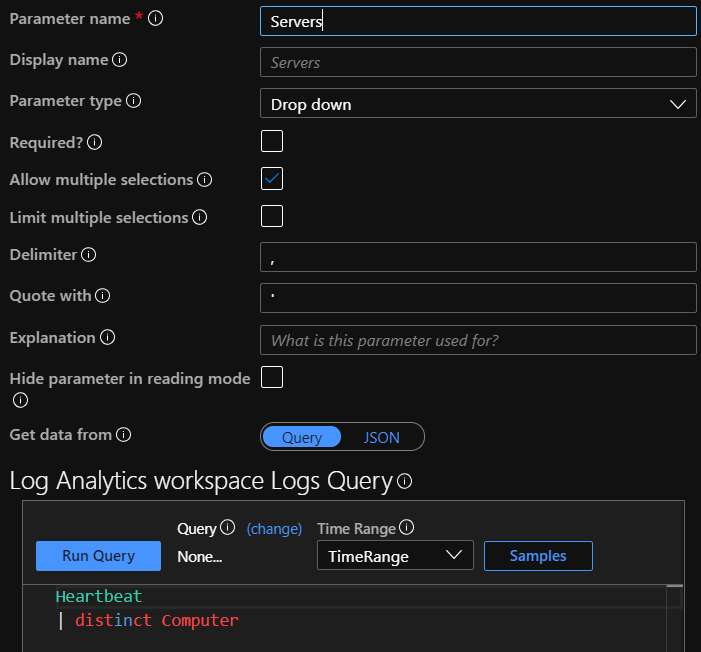
Servers
Not all Workbooks will require Servers but I use it often enough that I include in my Quick Start Template. This time choose Drop down, as before allow Multiple selection and All. We are going to populate our list from a query and a simple way to get a list of Servers is:
Heartbeat | distinct Computer
Once you have saved this workbook with your populated parameters it is now a simple matter to reuse this every time we want to create a new workbook with parameters. All you need to do is edit this one and Save As to start a fresh workbook with pre-done parameters.
Json Template
Below is the template to create your own easy quick start workbook, just create a blank one and paste the json code into the Advanced Editor in the Gallery Template section and click apply.
Azure Monitor workbooks are very powerful and a great addition to the Monitor toolset you can learn more about them in my article here. Today we’ll be using Workbooks to create an availability report for our servers.
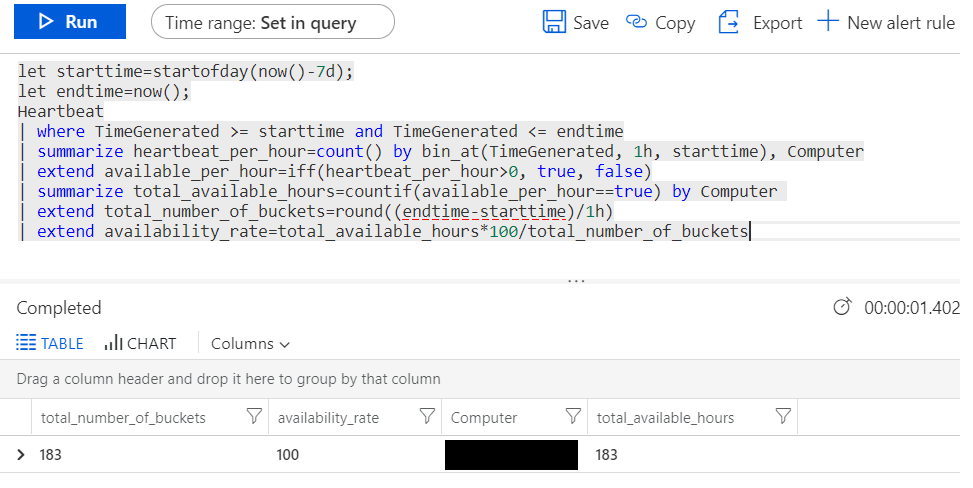
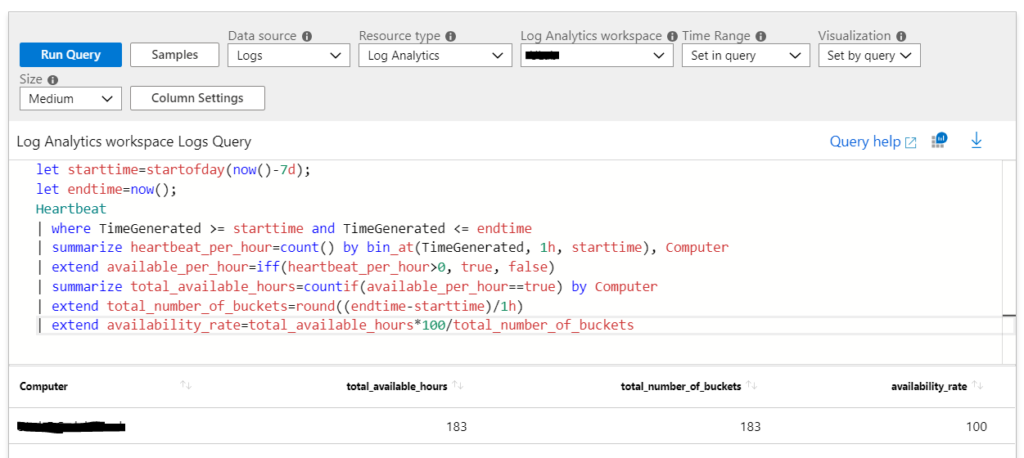
First we need our query, below is a fairly stock example of how to use the Heartbeat table to get the number of hours a server has been online and compare that to a set number of hours, in this case the past 7 days (168 hours) and work that out as a percentage.
let starttime=startofday(now()-7d); let endtime=now(); Heartbeat | where TimeGenerated >= starttime and TimeGenerated <= endtime | summarize heartbeat_per_hour=count() by bin_at(TimeGenerated, 1h, starttime), Computer | extend available_per_hour=iff(heartbeat_per_hour>0, true, false) | summarize total_available_hours=countif(available_per_hour==true) by Computer | extend total_number_of_buckets=round((endtime-starttime)/1h) | extend availability_rate=total_available_hours*100/total_number_of_buckets
As you can see running this query against your Log Analytics workspace will return exactly that, The Computer name, the total number of hours or “buckets”, the number of available hours and the percentage or Availability rate.
Once we have a working query it’s time to create our workbook, this can be done under the Azure Monitor blade of the Azure console, simple click on Workbooks which is still in preview and then click new.
Click add query and configure your workspace as shown below, then click Run Query
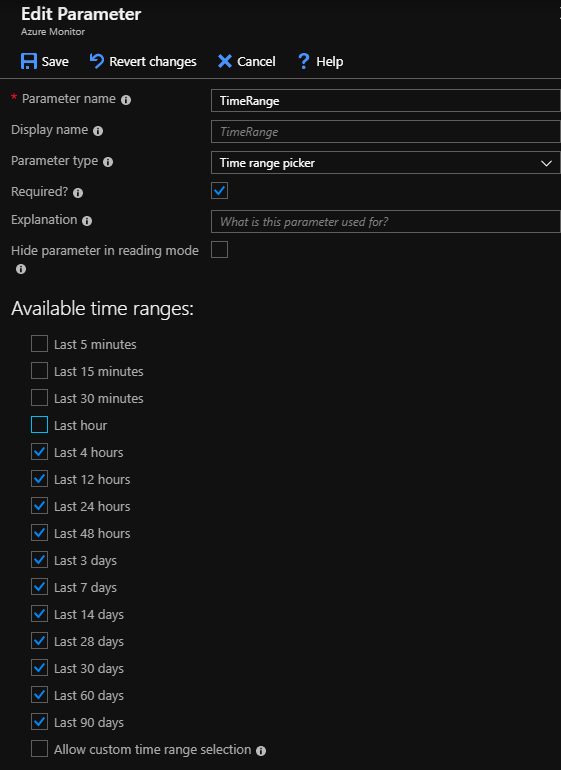
So far so good, now we want to be able to select the time range for our availability report. to do this click add Parameters at the bottom of the editor. Conveniently there is a pre-built parameter called Time range picker so we’ll use that. Make sure you tick required to make this mandatory for the Workbook.
Save your new parameter and then click the up arrow to move this section to the top of the page.
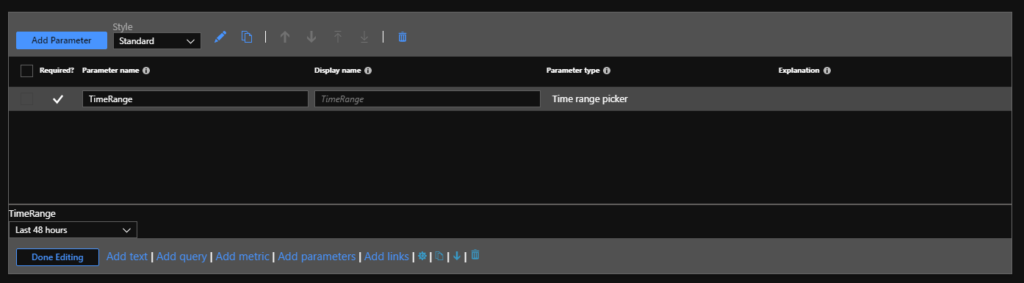
Now our query needs a slight adjustment to be able to use the time picker, below you can see I’ve created variables for the time ranges and substituted them into my query in the relevant locations.
let timeRangeStart = {TimeRange:start}; let timeRangeEnd = {TimeRange:end}; Heartbeat | where TimeGenerated >= timeRangeStart and TimeGenerated <= timeRangeEnd | summarize heartbeat_per_hour=count() by bin_at(TimeGenerated, 1h, timeRangeStart), Computer | extend available_per_hour=iff(heartbeat_per_hour>0, true, false) | summarize total_available_hours=countif(available_per_hour==true) by Computer | extend total_number_of_buckets=round((timeRangeEnd-timeRangeStart)/1h) | extend availability_rate=total_available_hours*100/total_number_of_buckets
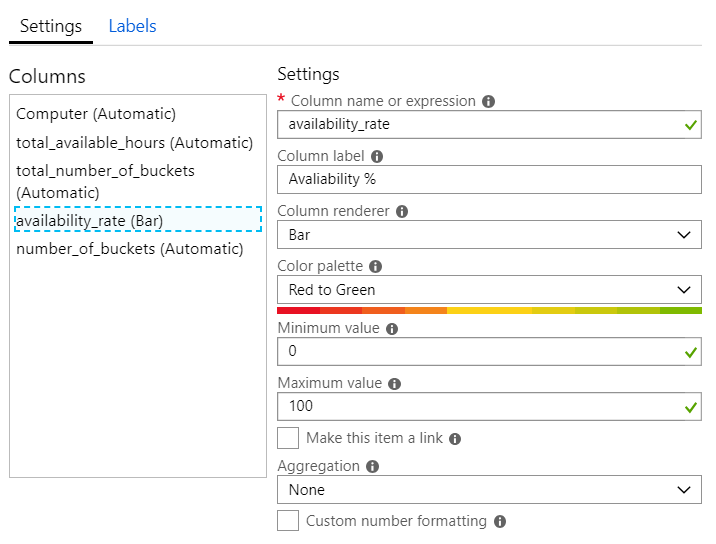
Lastly we want to add a bit of colour to the report, a nice way to do this is to click on the Column Settings button, select availability rate and configure it to display as a bar. Making the colour palette Red to Green also means that the higher the number the more green the bar becomes allowing servers with poor availability to stand out.
Click save and there you have it a Server Availability Workbook for Azure Monitor. Save this workbook and you can access it from the workbook gallery and also pin it to an existing Azure Dashboard.